



Whether you are an experienced contractor bidding on a commercial job or a homeowner taking on a weekend DIY renovation, installing a new floor is one of the most transformative upgrades you can make to a space. Modern vinyl options—like Stone Plastic Composite (SPC) and Luxury Vinyl Tile (LVT)—have made installation faster and cleaner than ever thanks to click-lock engineering and advanced dimensional stability.
However, even the highest-grade, 100% waterproof floor can fail prematurely if simple installation protocols are ignored. A single missed prep step can lead to unsightly joint gaps, hollow sounds, or buckled planks just months down the line.
To help you protect your investment and execute a flawless project, here are the most common flooring installation mistakes and exactly how to avoid them.
1. Skipping Proper Subfloor Preparation
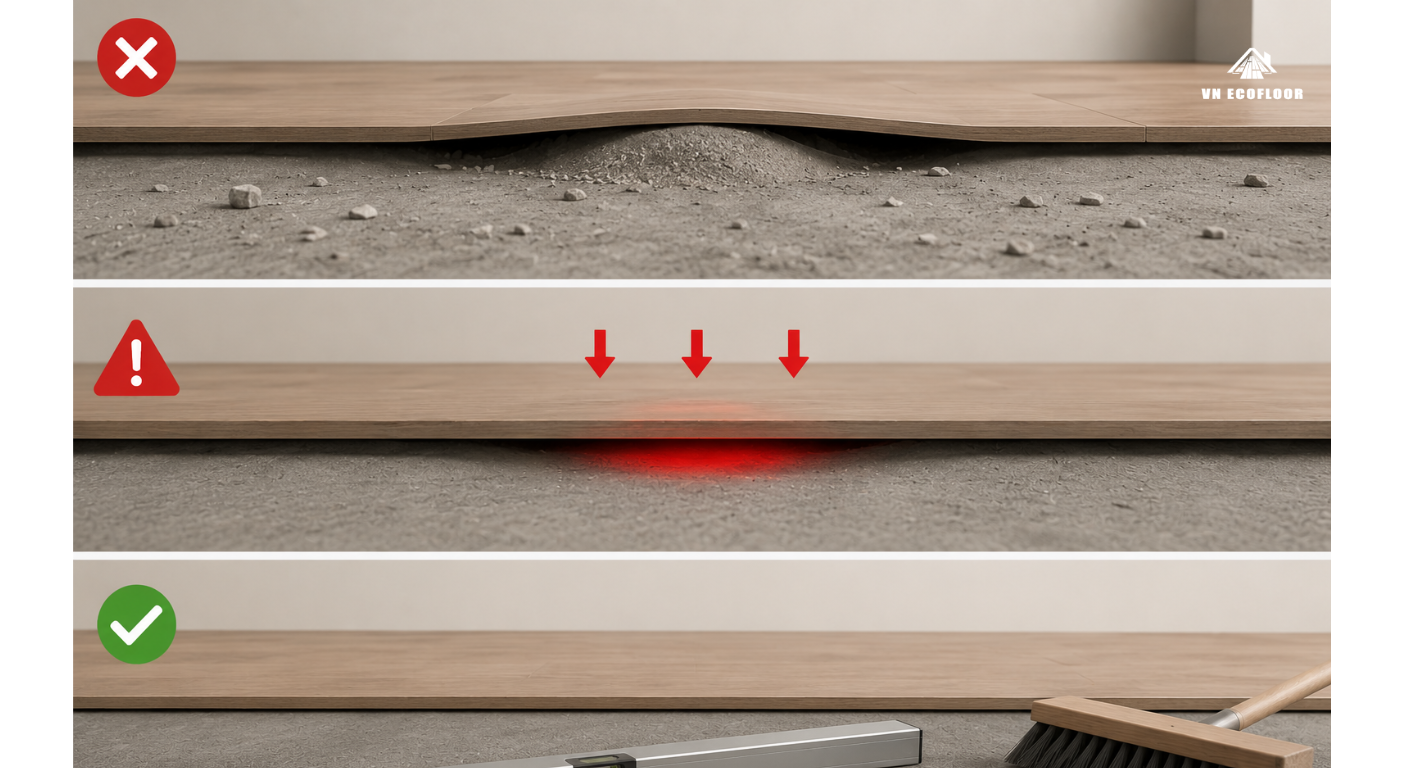
The biggest secret in the flooring industry is that your finished floor is only as good as the subfloor underneath it. Many installers assume that because rigid core SPC is stiff, it will easily bridge deep dips or high spots in the subfloor.
- The Mistake: Laying planks over uneven concrete, unsanded plywood seams, or dirty subfloors littered with debris and drywall dust.
- The Consequences: Dips in the subfloor create hollow pockets underfoot. Every time someone walks over that spot, the plank flexes, putting severe stress on the click-lock joint until it eventually snaps or disengages.
- How to Avoid It: Always thoroughly clean, sweep, and vacuum the subfloor. Use a 6-foot straightedge to check for flatness. High spots must be sanded or ground down, and low spots deeper than 3 mm over a 2-meter radius must be filled before laying a single plank.
2. Ignoring Expansion Gaps Around the Perimeter
Even high-performance, dimensionally stable SPC and LVT floors expand and contract slightly as indoor temperatures and humidity levels shift throughout the seasons.
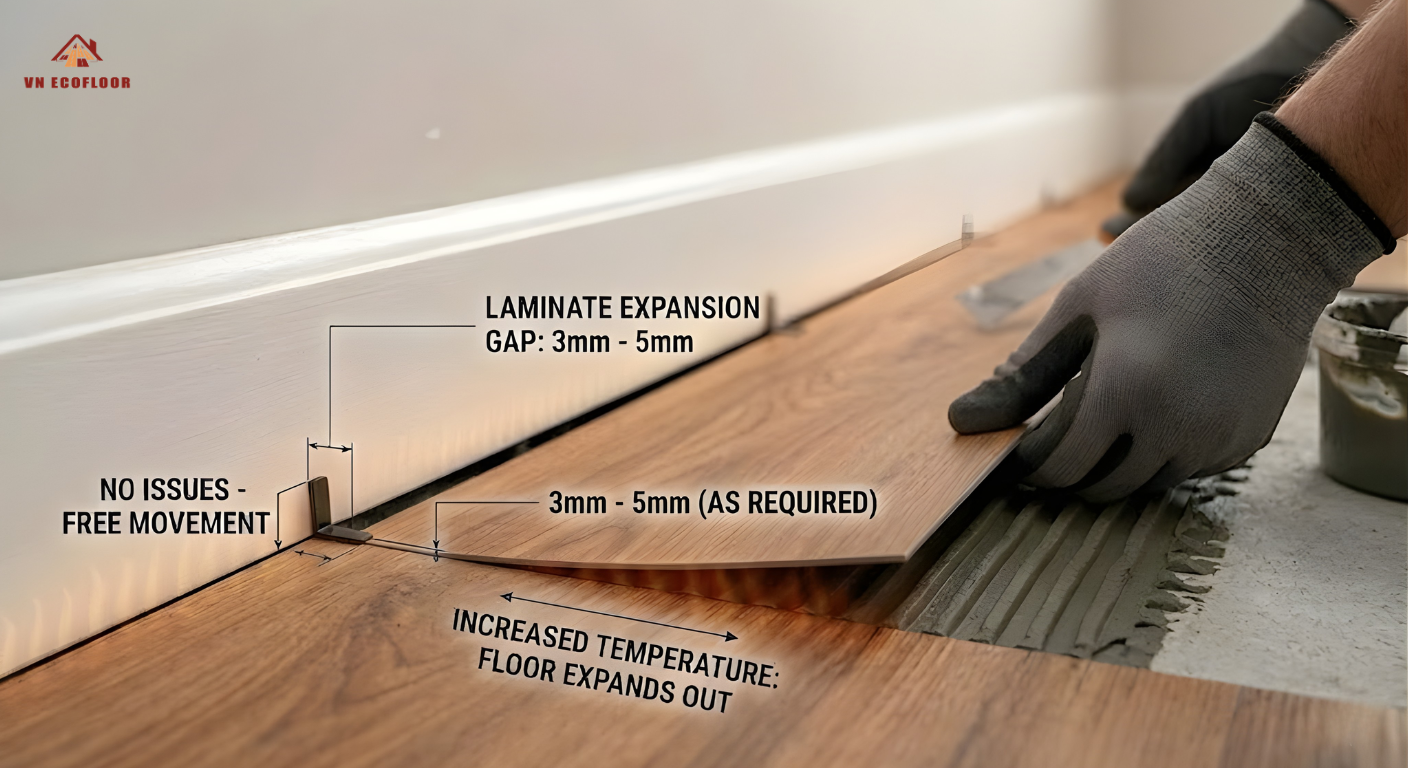
- The Mistake: Pushing the flooring planks tight against walls, door frames, or heavy fixed cabinetry without leaving a buffer zone.
- The Consequences: When ambient temperatures rise, the flooring matrix naturally expands. If the planks have no space to breathe against the walls, they will push against each other, causing the center of the room to tent, peak, or buckle upward.
- How to Avoid It: Always use wall spacers during installation to maintain a consistent 3 mm to 5 mm expansion gap along the entire perimeter of the room, including around pipes and door jambs. This gap will be completely hidden once you install baseboards or quarter-round molding.
3. Forgetting to Stagger Joint Seams Correctly
Aesthetically and structurally, the layout pattern of your planks matters just as much as the subfloor prep.
- The Mistake: Aligning the end joints of adjacent rows too close together or creating a predictable “stair-step” pattern across the entire room.
- The Consequences: End joints placed too close together create weak focal points across the floor, making the click-lock system vulnerable to separation under heavy rolling loads. Visually, it breaks the natural flow of wood grain and looks amateurish.
- How to Avoid It: Stagger the end joints of adjacent rows by at least 200 mm to 300 mm (8” to 12”). If you are installing a random staggered straight lay, take the cut piece from the end of your first row (provided it is long enough) to start your second row to maintain an organic, natural flow with minimal material waste.
4. Over-Tapping or Forcing the Click-Lock Joints
Modern click-locking systems (such as Unilin or Valinge profiles) are precision-milled to lock together smoothly at specific angles.
- The Mistake: Forcing planks together using brute strength, swinging a heavy hammer directly against the click edge, or using incorrect tapping block techniques.
- The Consequences: Striking the delicate tongue or groove directly will micro-fracture or crush the click system. The floor may look fine right after installation, but the damaged joint will slowly pop open or squeak over time under daily foot traffic.
- How to Avoid It: Always angle the tongue into the groove at the manufacturer’s recommended angle (usually around 20° to 30°) and fold it down gently. If you need to snug a joint, never strike the plank directly—always use a rubber mallet paired with a dedicated vinyl tapping block and a pull bar for perimeter walls.
5. Laying Planks Over Unchecked Concrete Moisture
While SPC and LVT materials are 100% waterproof themselves, the concrete slab underneath them is not.
- The Mistake: Installing vinyl directly over a freshly poured concrete slab or a damp basement floor without testing for moisture vapor emissions or using a vapor barrier membrane.
- The Consequences: Concrete slabs absorb moisture from the ground underneath. Rising moisture vapor traps water under the non-porous vinyl, creating a breeding ground for mold, mildew, and foul odors while potentially damaging subfloor adhesives or underlayment pads over time.
- How to Avoid It: Test the concrete slab moisture levels before installation. If installing over ground-level or sub-grade concrete, always lay down a 6 mil polyethylene moisture barrier film beneath your planks (unless your SPC already features a pre-attached IXPE pad certified as a hydrophobic vapor barrier).
Quick Checklist: Pre-Installation Do’s & Don’ts
| Action | DO | DON'T |
|---|---|---|
| Subfloor Prep | Level low spots and sand high spots flat | Expect rigid SPC to bridge deep subfloor dips |
| Perimeter | Maintain a 6" mm"-10" mm" expansion gap | Butt planks tight against walls or cabinets |
| Plank Layout | Stagger end-joints at least 200" mm" apart | Align joints in a straight, uniform grid |
| Tool Use | Use a tapping block and rubber mallet | Hit plank click-edges directly with a hammer |
| Concrete Slabs | Test slab moisture and use a vapor barrier | Install over wet, freshly poured concrete |
In Conclusion
Avoiding flooring installation mistakes isn’t complicated—it simply comes down to thorough subfloor prep, respecting expansion gaps, and using the right tools. By following these fundamental steps, you ensure your new vinyl floor stays flat, silent, and structurally sound for decades.
To make your installation even smoother, starting with high-precision materials is key. As a leading manufacturer out of Vietnam, VN Ecofloor engineers premium SPC and LVT lines with 100% virgin resin cores and precision German click-lock milling. Our floors are designed to lock together seamlessly, eliminating job-site headaches and ensuring a flawless finish every single time.
👉 [VISIT VN ECOFLOOR TO REQUEST INSTALLER SAMPLES]
- Hotline/WhatsApp: +84 88 801 81 28
- Official Website: vnecofloor.com
FAQs
- Do I really need an underlayment pad with SPC vinyl flooring?
If your SPC planks come with a pre-attached IXPE or EVA backing pad, you do not need to install an additional underlayment. Adding a second layer of soft padding can actually make the floor too flexible, causing the click-lock joints to bend and snap under heavy foot traffic. However, if installing over ground-level concrete, a thin 6-mil plastic vapor barrier film is still recommended to block subfloor moisture.
- How long should SPC or LVT vinyl flooring acclimate before installation?
Even though rigid core SPC is dimensionally stable, it should still acclimate in the installation room for at least 24 to 48 hours before laying the planks. Store the unopened boxes flat in a climate-controlled environment (18° to 26°) so the material adapts to the room’s baseline temperature.
- Can I install heavy kitchen cabinets or islands on top of click-lock SPC flooring?
No, click-lock vinyl flooring is designed to be a “floating floor.” Installing heavy fixed cabinetry or kitchen islands directly on top of the planks pins the floor down, preventing natural thermal expansion and contraction. This will cause the surrounding floor to tent or pull apart at the seams. Always install cabinets first, then lay the floating floor up to the cabinet legs with an expansion gap.
- What happens if I don’t leave an expansion gap around the walls?
Without a proper 3 mm to 5 mm expansion gap along the room’s perimeter, the floor has nowhere to go when room temperatures rise. As the planks expand, they will push against the walls and bind against each other, causing the planks in the center of the room to peak, buckle, or pop open at the joints.
- Can I install SPC vinyl flooring over an existing tile floor?
Yes, you can install SPC over existing ceramic or porcelain tile, provided the tile is firmly bonded and structurally sound. However, wide or deep grout lines must be filled with a patch compound first to create a dead-flat surface, preventing the grout line pattern from telegraphing through or causing hollow spots.
- Why are my click-lock joints coming apart after installation?
Joint separation is usually caused by three main issues: installing over an uneven subfloor (which flexes the joints), failing to leave expansion gaps (causing stress under thermal expansion), or over-tapping and damaging the delicate click system during installation.